Applicant Tasks
Last updated: October 14, 2026
Applicant Tasks let your team send targeted requests for documents or information to applicants directly within Glide. When a task is assigned to applicant, they see it directly in their portal and can respond from any device.
Use Applicant Tasks to:
Request supporting documents (proof of address, government ID, proof of income, insurance)
Collect short-form responses (source of funds, secondary contact information, clarifying questions)
Track the status of each outstanding item in one place, across all applicants on a membership
How It Works
There are two parts to the feature:
Templates — created once under Configure → Applicant Tasks and reused across applications
Task assignments — added to a specific application from the Applicant Tasks tab in the application view.
When a task is assigned, the applicant sees it under Additional Information Requests in their onboarding portal with a clear status (Missing or Completed). Staff can monitor progress, send reminders, and manually update statuses from the dashboard.
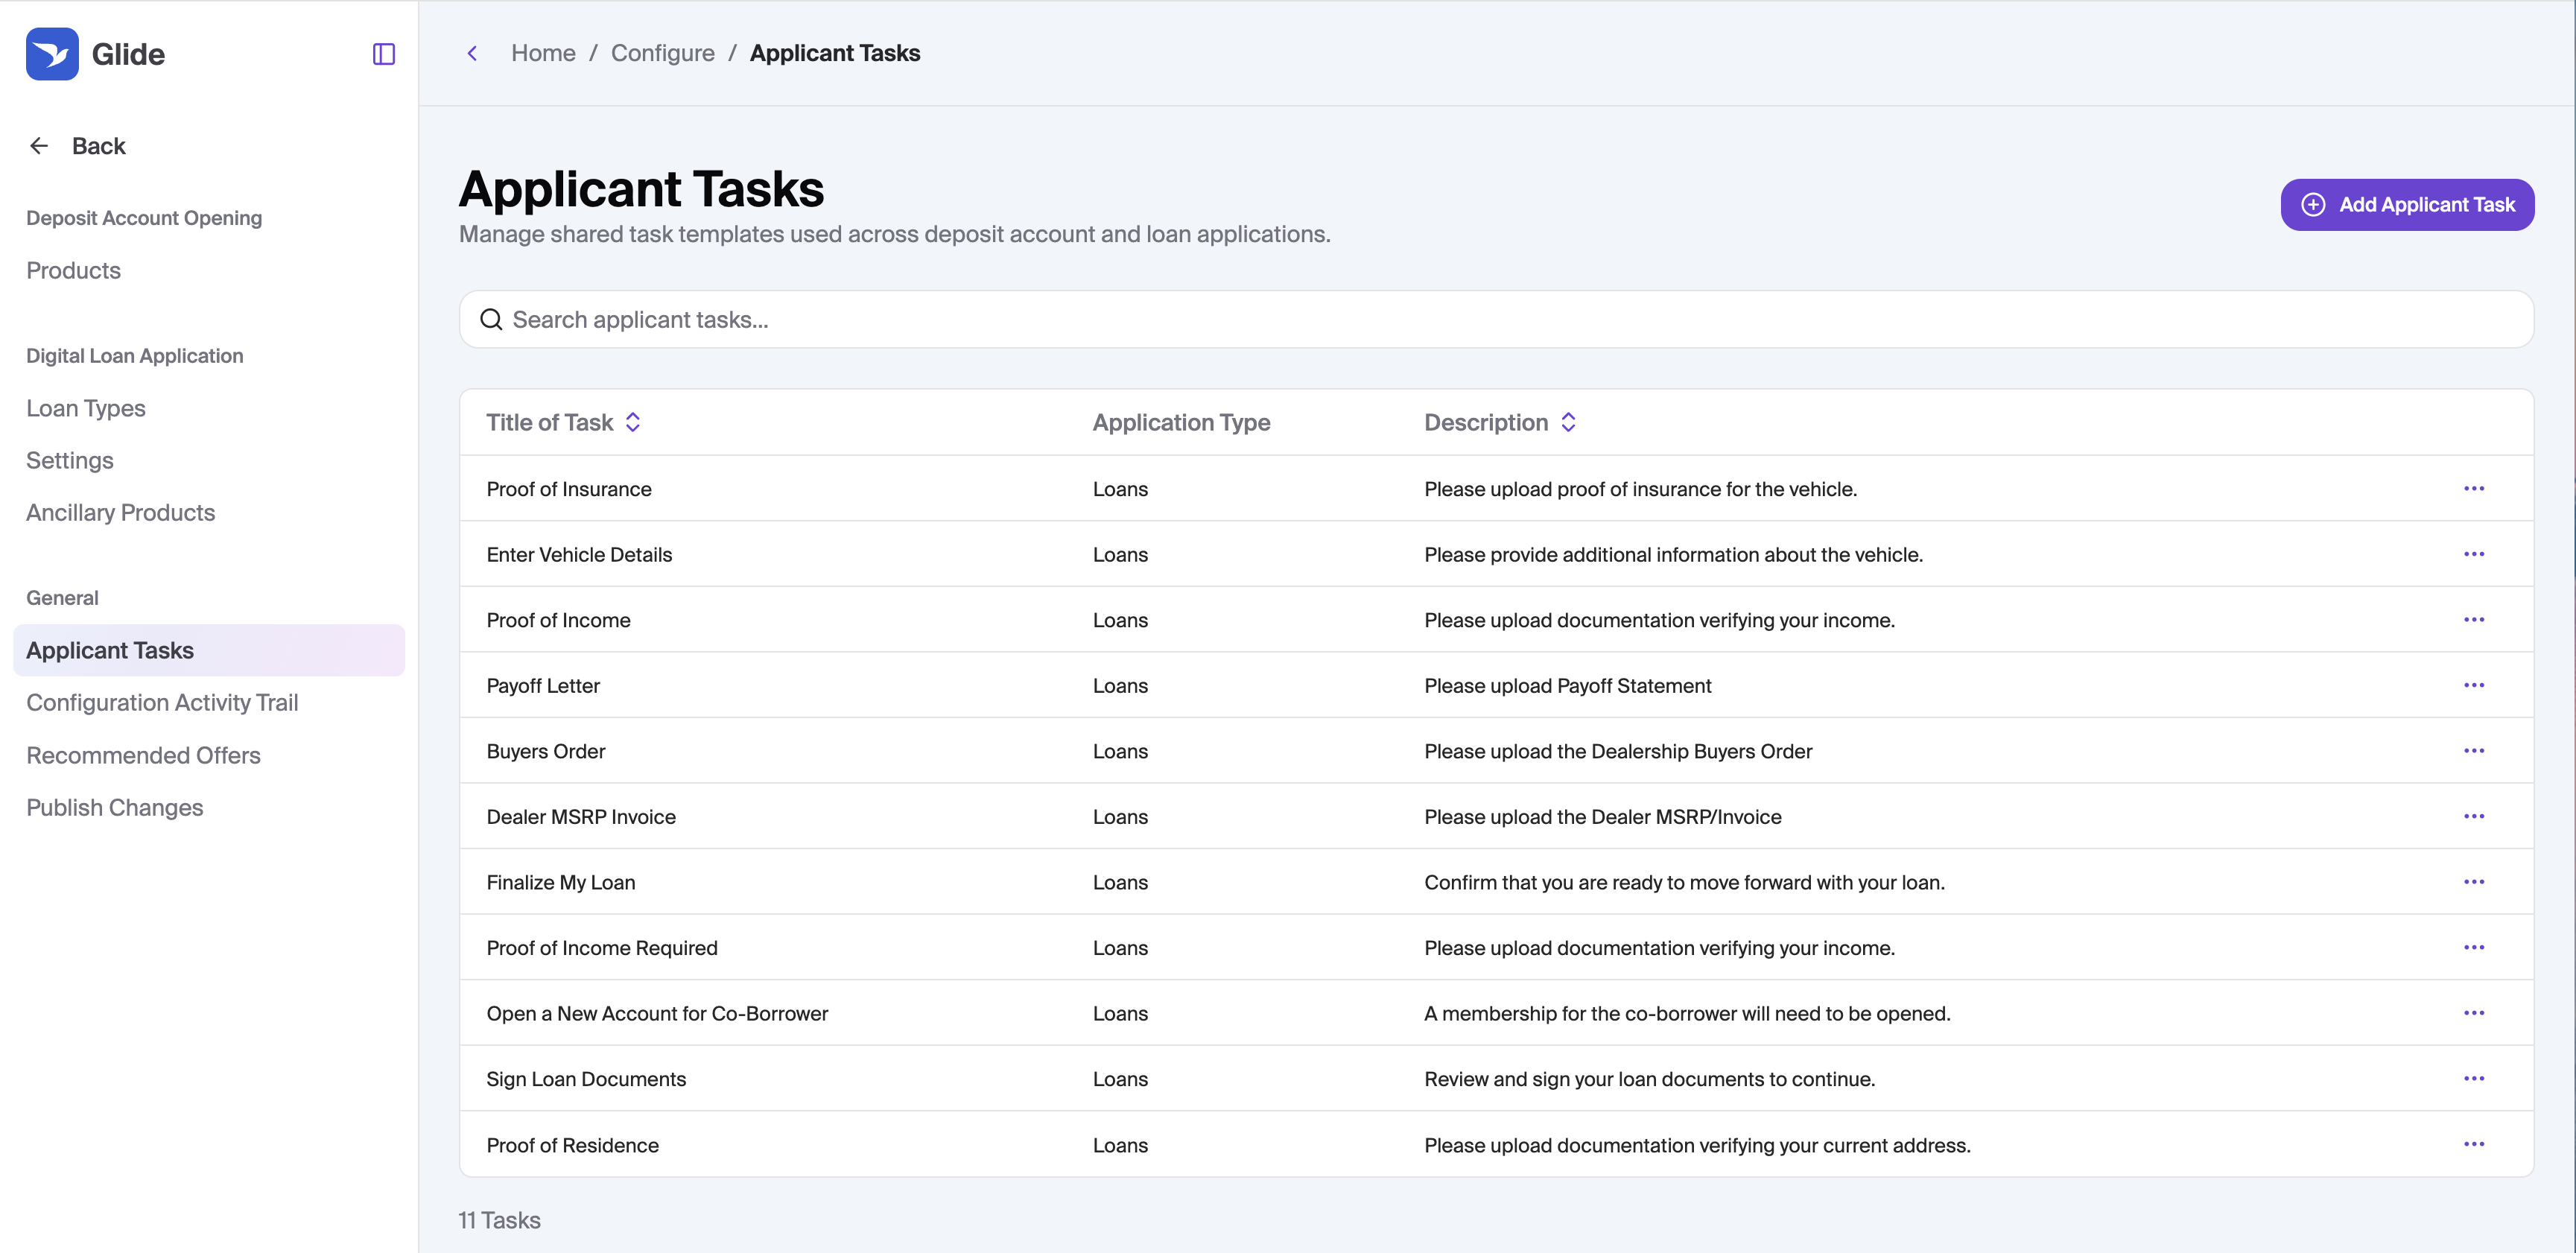
Setting Up Applicant Task Templates
Before assigning tasks to individual applications, create reusable templates so your team doesn't have to re-enter the same details every time.
To create a template:
Go to Configure → Applicant Tasks
Click Add Applicant Task
Select an Application Type — either Deposit Account or Loans
Select a Task Type — either Document upload or Form (see Task Types below)
Enter a Title of Task — this is the headline the applicant sees
Enter a Description of Request — additional context shown to the applicant
Fill in any task-type-specific fields (see below)
Click Add Task
Templates are shared across all applications of the matching type (Loans or Deposit Account). Editing or deleting a template does not affect tasks already attached to an application — each task is a snapshot taken at the time it was added.
To edit or delete an existing template, find it in the table and use the kebab row menu.
Permissions: Creating, editing, and deleting templates requires "Configure" permission. Without it, the page is read-only.
Task Types
Document Upload
Use this when you need the applicant to provide a file.
When creating the template, you'll fill in two additional fields:
Document Title — the headline shown to the applicant inside the upload drawer (e.g., "Pay Stub")
Specific Instructions — detailed guidance about what to upload (e.g., file format, date range, what information must be visible)
Variable number of documents - If enabled, the user can upload any number of documents before indicating that they have finished. Use this toggle when the number of documents required may vary from app to app.
Required Documents - Enter the number of documents users are asked to upload for the applicant task.
Applicant experience: The applicant sees an Upload button and an Accepted documents link that opens a drawer with your Document Title and Specific Instructions. They can upload one or multiple files.
Accepted file types: PDF, JPG/JPEG, PNG. Other file types are rejected at upload.
Once the applicant uploads any file, the task automatically moves to Received. They can still attach additional files afterward using Upload additional documents.
Form
Use this when you need short written answers from the applicant rather than a file.
When creating the template, add one or more questions under the Questions section. Click + Add Question to add additional fields. Each question renders to the applicant as a single-line text input.
Applicant experience: The applicant sees an Enter details button that opens a drawer with your questions. They fill in their answers and click Submit. Once submitted, the task moves to Received.
Note: Form questions are free-text and dropdown only. There are no date pickers, required/optional flags, or conditional logic supported. Use the description and question labels to set clear expectations.
External Link
Use this when you need the applicant to take an action on an external site such as fill out a form or complete a certification.
When creating the template, you'll fill in one additional field:
Action URL — the url that the user will be directed to
Applicant experience: The applicant sees an Open Secure Link button that will take them to the specified URL. After the link is clicked, a new I've Completed This Step button appears for the user to indicate that they have finished.
After the link is clicked, the task status is updated to Link Opened. Once the user clicks I've Completed This Step, the task status is updated to Received.
Assigning Tasks to an Application
Once you have templates, you can assign them to specific applications — or create one-off custom tasks on the fly.
To assign a task:
Open the application from your queue
Click the Applicant Tasks tab
Click + Add Task
Select a template from the Add Task dropdown, or choose Custom to create a one-time task
Fill in any required assignment fields (see DAO and DLA sections below)
Click Add Task
The task is created with a status of Requested and immediately visible to the assigned applicant in their portal.
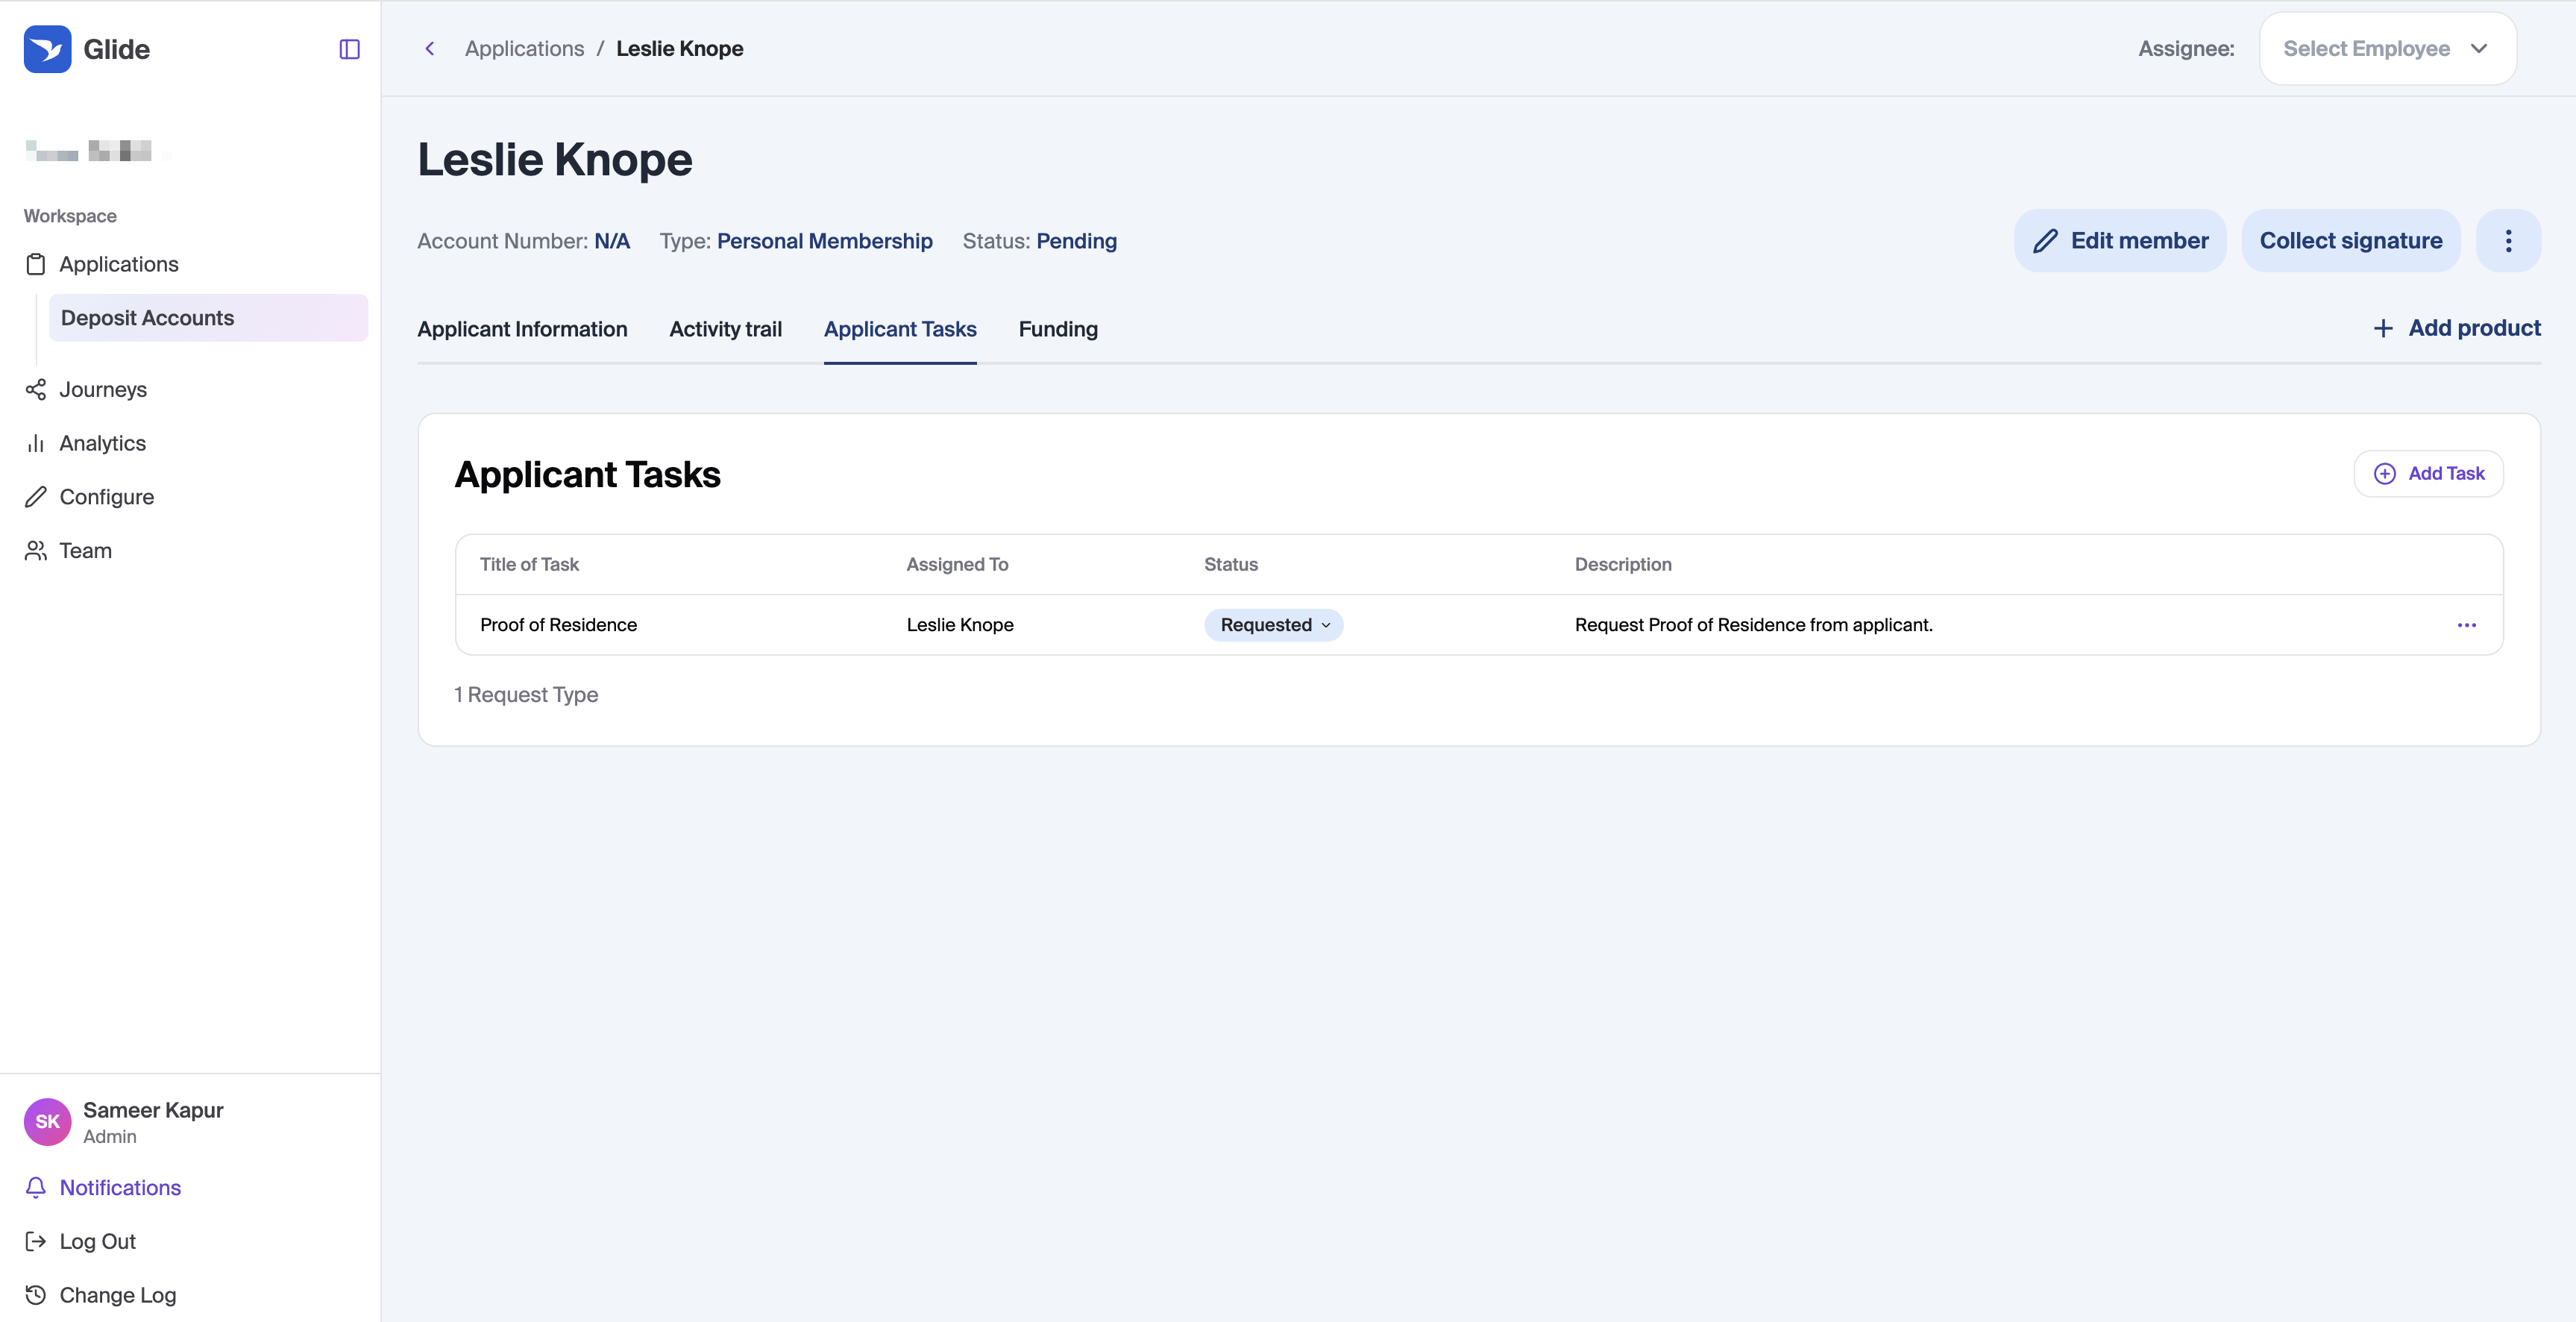
Task Statuses
Status | What it means |
|---|---|
Requested | Sent to the applicant; waiting for them to complete it |
Received | The applicant responded, or a staff member manually marked it complete |
Waived | Staff cleared the request without applicant action — hidden from the applicant's view |
You can change the status at any time by clicking the status badge on a task row and selecting a new value. To re-open a completed task, click into the task detail and use Send Again (resets to Requested).
Viewing Submissions
Click any task row to open the submission details:
Document upload tasks: Shows a table of uploaded files with names and upload dates. Each file links to the document.
Form tasks: Shows the applicant's submitted answers.
Deposit Account Opening (DAO)
Assigning to a Role
When you click + Add Task on a deposit application, the slide-over includes an Assign To dropdown. This lists every person currently on the membership, starting with the primary applicant.
The dropdown shows people by name (e.g., "Jane Smith"). The underlying role — Primary, Joint Owner, Beneficiary, Authorized Signer, Trustee, etc. — determines who appears, but you select the individual.
To request the same task from multiple roles (e.g., proof of ID from both the primary and a joint owner), add the task once per person. Each assignment becomes its own task row with its own status.
What Staff See
The Applicant Tasks table for deposit applications includes an Assigned To column showing which applicant each task belongs to. All tasks across all roles on a membership are visible in one table when you're viewing the primary applicant's application.
What Applicants See
Each applicant only sees tasks assigned to them. A joint owner, for example, logs into their own portal and sees only their outstanding tasks — not tasks assigned to the primary applicant.
Digital Loan Applications (DLA)
When Tasks Become Available
The Add Task button is not available until the loan application has been approved or counter-offered. Before that point, the Applicant Tasks tab shows:
Tasks will be available once the application has been approved or counter-offered.
LOS Stipulation ID
When creating loan task templates, you can include an LOS Stipulation ID — a reference code used to link the task to a specific requirement in your loan origination system.
For FIs integrated with supported LOS systems, applicant tasks are automatically added to applications if the matching stipulation is added within the LOS and documents uploaded by the applicant are automatically pushed to the matching loan record in the LOS.
Conditionally Created Applicant Tasks
If your LOS does not fully support stipulation creation, the rules for when applicant tasks are created can be configured directly within Glide.
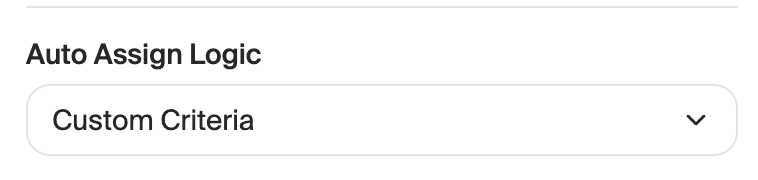
On the Applicant Task editing page, set the Auto Assign Logic to "Custom Critera"
Click Add Group
Configure the group
Loan Status - Whether the loan needs to be Approved, or just Submitted in order to trigger the task
Additional Filters can be added by clicking Add Filter
Loan Type - Select which loan types or categories or sub-categories the task applies to
Loan amount - Choose the range of loan amounts the task applies to. Supported operators are: equals, greater than, less than, greater than or equal, less than or equal, and between.
Credit Score - Choose the range of credit scores the task applies to. Supported operators are: equals, greater than, less than, greater than or equal, less than or equal, and between.
Additional Income Type - Select which additional income types will require the task.
Form Answer - Trigger the applicant task based on answers to a form applicant task (see Form type above)
Employment Status - Trigger the applicant task based on the applicant's employment status
Group Logic
Within a given group of rules, AND logic will be used. E.g., Loan is approved AND credit score is below 700 AND employment status is retired.
Across groups OR logic will be used. E.g., group 1 OR group 2 OR group 3
System-Managed Loan Tasks
The following tasks are created automatically by Glide for certain loan states:
Create a membership — shown to loan applicants who don't yet have a membership
Vehicle information — shown on vehicle loans when vehicle details are missing
Finalize my loan — shown once all other tasks are complete; the applicant uses this to complete the loan flow
Email Reminders
Applicant tasks connect to a drip campaign in Customer.io. There is a unique drip campaign for DAO applicant and DLA applicant tasks.
In addition to the automated drip campaign, from the applicant task tab, you can send a manual email reminder to the assigned applicant for any task. This is connected to trigger a transactional email in Customer.io, separate from the individual campaigns.
To send a reminder:
Find the task row in the Applicant Tasks tab
Click the ⋯ overflow menu
Select Send Email Reminder
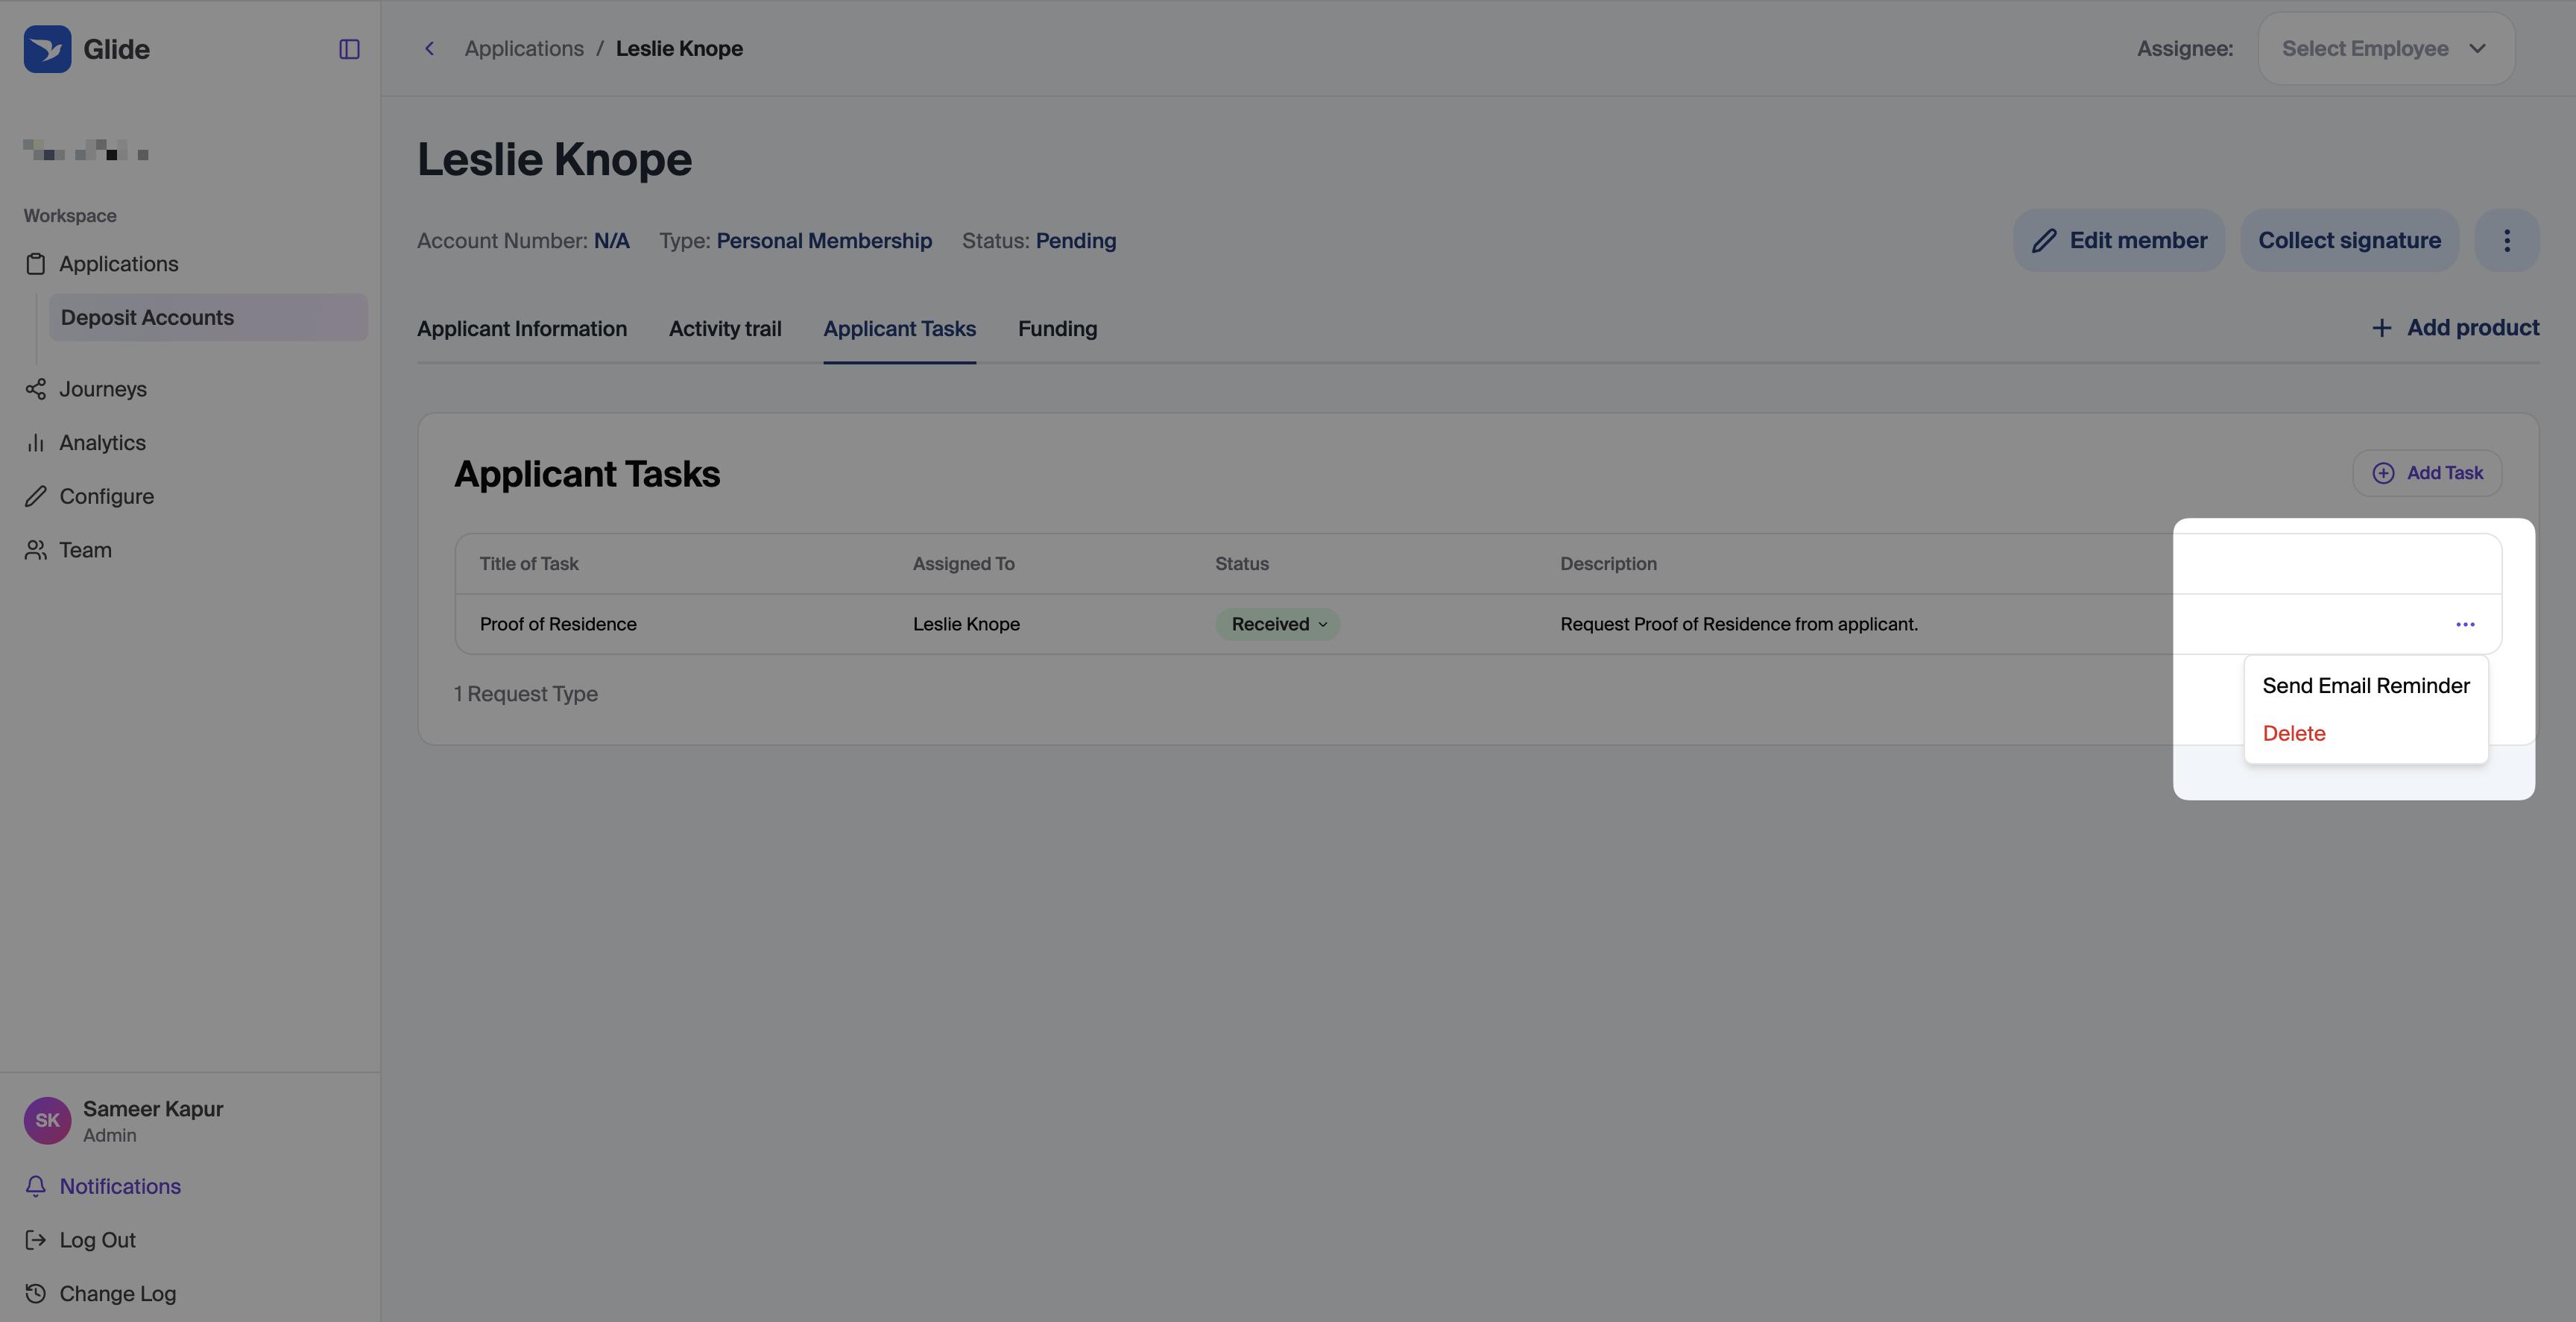
The reminder is sent to the assignee's email on file and logged in the Activity Trail. A success message will confirm: Reminder sent for [Task Title] to [Assignee Name].
Common errors and what they mean:
Error | What to do |
|---|---|
This assignee does not have an email address on file. | The applicant's email is missing from their profile. |
This applicant task does not have an assignee to email. | The task was not assigned to a specific person. |
Email reminder template missing. Contact us to add your email template. | Your FIs reminder email template hasn't been configured within customer.io. Contact Glide support to add. |
Activity Trail
Every action taken on an Applicant Task is logged in the application's Activity Trail:
Task added
Task status updated
Task deleted
Email reminder sent
Document uploaded by applicant
Form submitted by applicant
This gives your team a full audit history of each request without any additional tracking.
Staff Notifications
When an applicant completes a task — by uploading a document, submitting a form, or signing — Glide automatically notifies the relevant staff members so they can follow up without manually checking the application.
Who gets notified:
The staff member who created the task
Any staff member assigned to the application (DAO only — DLA does not have an application assignee)
If the same person created the task and is assigned to the application, they receive one notification, not two.
How you're notified:
In-app — a notification appears in the dashboard notification center (the bell icon in the bottom-left). It includes the applicant's name, the task title, and a direct link to the Applicant Tasks tab.
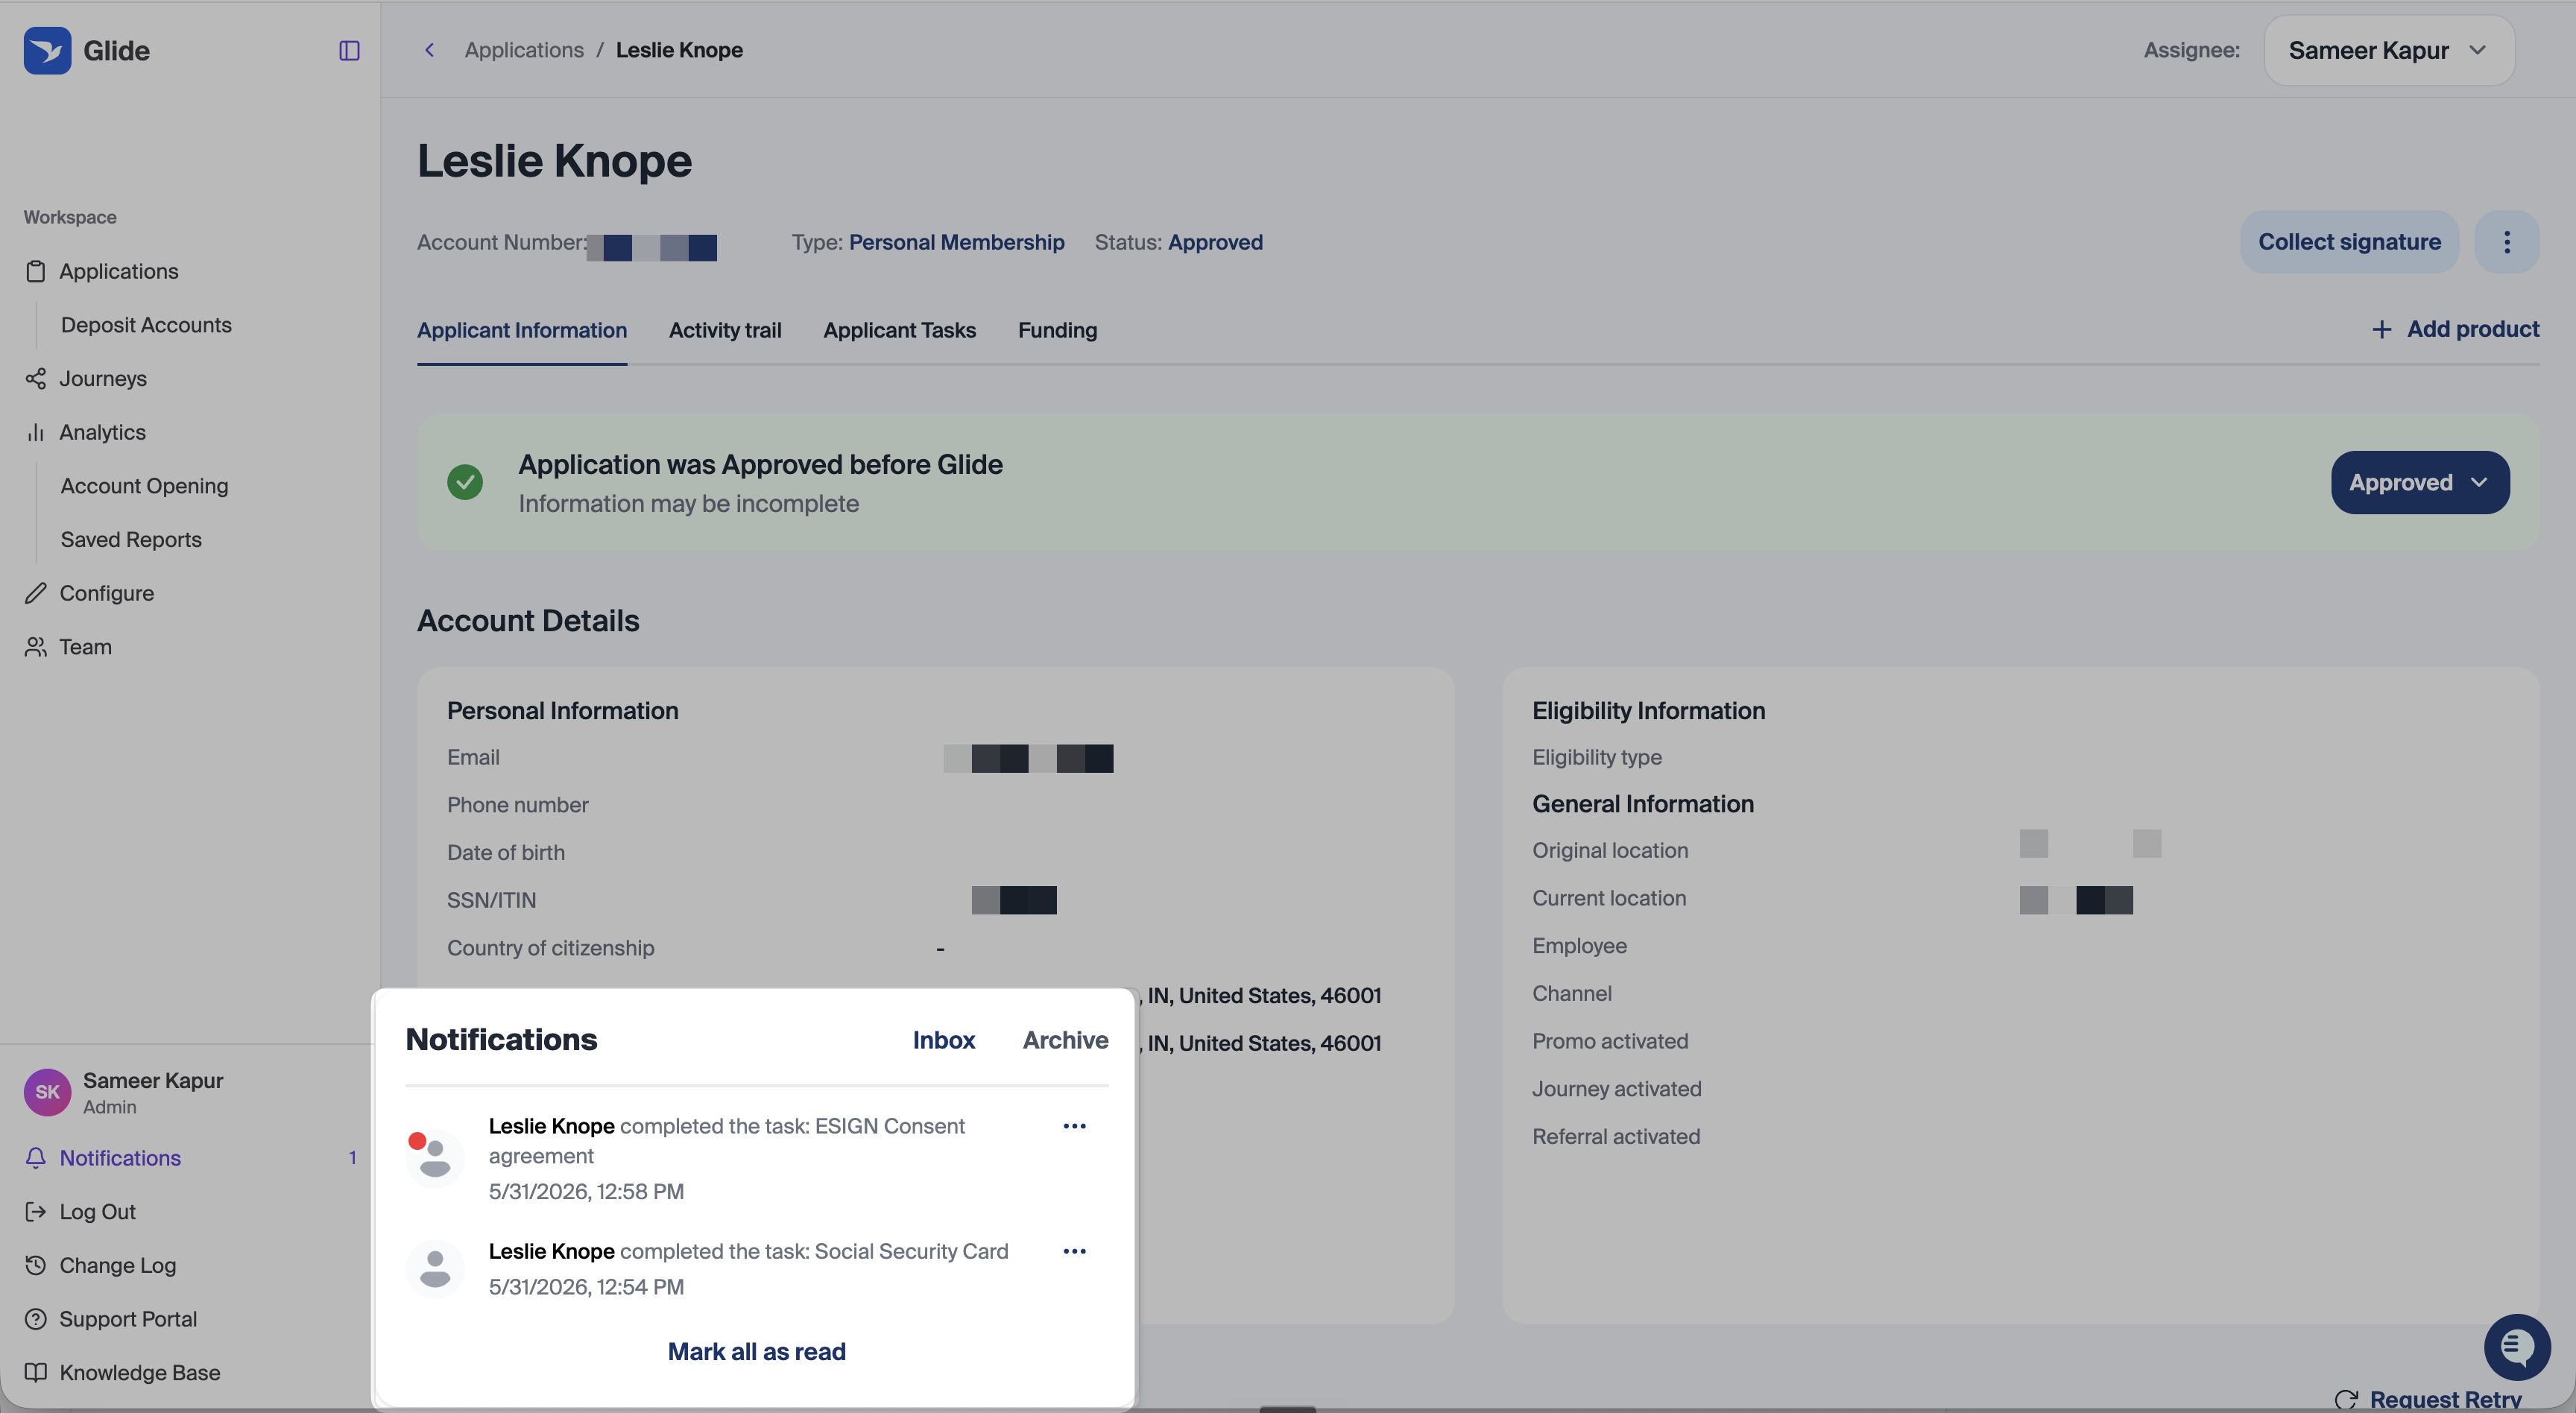
Email — an email is sent with the applicant's name, task title, and a link back to the application.
Tips
Build your template library first. Templates save time and ensure consistent instructions across your team.
Use Specific Instructions thoroughly. Clear guidance reduces back-and-forth — tell the applicant exactly what format you need, what dates should be visible, and what qualifies as an acceptable document.
Use Waived, not Delete, when a task is no longer needed. Waived keeps the task in your staff view for audit purposes; Delete removes it entirely.
For the same request across multiple DAO roles, add the task once per assignee rather than creating separate templates.
FAQ: How do I set up email notifications to a shared inbox when applicant tasks are submitted?
You can use Customer.io to email a shared inbox or distribution list when an applicant submits a task. This gives your team visibility even when the task creator is unavailable. These emails are additional to Glide’s individual staff notifications.
1. Create a staff notification automation
In your institution’s Customer.io workspace, go to Automations → Create automation and choose an Event trigger. Give it a clear name, such as “Account opening — staff task notifications.” Create separate automations for account-opening and loan tasks.
2. Choose the right trigger
Account-opening tasks (DAO)
Set the event name to dao_applicant_task_submitted. If it is not listed, type the name exactly as shown.
This sends a notification when an applicant submits a form, confirms an external-link task, or finishes uploading the required documents for a staff-created account-opening task. Automatically created tasks and staff changes to a task’s status do not trigger this notification.
Do not use dao_open_applicant_tasks: that event relates to outstanding requests, not a submitted task. Leave validation-status filters off for DAO; its validation_status is not_applicable.
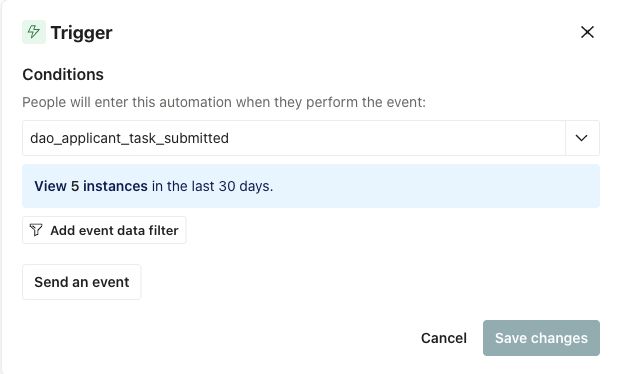
Account-opening notification trigger in Customer.io.
Loan tasks (DLA)
Set the event name to dla_applicant_task_submitted to notify staff when an applicant submits a loan task. For document tasks that use automated validation, the notification waits for the validation result.
To receive every submission notification, leave validation-status filters off. If your team only wants documents that passed automated validation, add an event-data filter for validation_status equal to accepted. This excludes rejected submissions and tasks without automated validation (not_applicable), including forms.
Prefer a notification when all loan tasks are submitted? Use dla_all_applicant_tasks_submitted instead. “Finalize my loan” is excluded. This means the tasks have been submitted, not that every document passed validation. This event does not include task_name or validation_status; leave those fields out of its email.
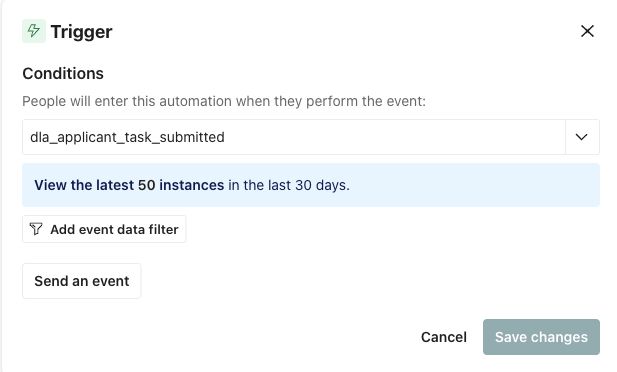
Loan notification trigger in Customer.io.
3. Set frequency and separate live applications from tests
In the trigger’s Frequency settings, select On every event. This allows another notification when the same applicant submits another task or resubmits a task after it is reopened.
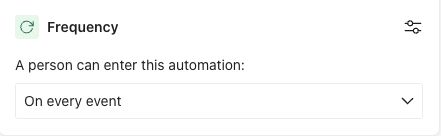
Use “On every event” to allow repeat notifications.
Add a True/False Branch before the email. Set its condition to Event attribute → environment → is equal to → prod.
True: Send to your shared staff inbox using your production dashboard link.
False: Keep the email as a draft, or send it only to an internal test inbox using your staging dashboard link.
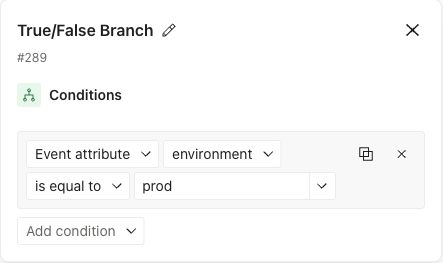
Route production events using the environment field.
4. Address and personalize the email
Add an Email step to the appropriate branch. Open Edit content and expand the email header. Set To to your shared inbox or distribution-list address. Replace the default recipient; do not use the applicant’s email as the destination.
Choose your institution’s sender and a clear subject, such as “Applicant task submitted.” Use these fields to add application details:
Detail | Account opening (DAO) | Loans (DLA) |
|---|---|---|
Applicant name |
|
|
Applicant email |
|
|
Task name |
|
|
Membership or loan type |
|
|
The DLA fields above are for dla_applicant_task_submitted. For the all-tasks event, omit the task name.
Add a View application link. Start with your institution’s dashboard address, then append the matching path below:
DAO:/dashboard/applications/{{event.application_user_id}}?tab=applicantTasks
DLA:/dashboard/loans/applications/{{event.loan_id}}?tab=applicant-tasks
Use the staging dashboard address in test emails and the production address in live emails. If you copy a loan email for account opening, replace both the loan fields and the application link with the DAO versions.
5. Test and turn on the notification
Keep production delivery off while setting up the email. Preview it with sample event data and send a test to an internal inbox. To test the full workflow, start the automation with the production email queued as a draft and the non-production email set to send automatically only to your internal test inbox.
In staging, have a staff member add a task to a test application, then submit it from the applicant portal. Check that Customer.io receives the event and the automation follows the test branch.
Confirm that the email reaches the test inbox, the applicant and task details display correctly, and the link opens the right application. Submit a second task to confirm another notification arrives.
When testing is complete and your DPM has confirmed availability, set the production email to send automatically and make sure the automation is running. Keep the non-production branch as draft or addressed only to your internal test inbox.
If an email does not arrive: Check the automation’s Journeys and Customer.io’s Message activity. Confirm that the automation is running, the email is not queued as a draft, the shared address is correct, and no filters or subscription settings are preventing delivery. If the task-submitted event is missing, contact your DPM or Glide Support to check your institution’s connection.
FAQ: How do I set up shared-inbox notifications for loan applications and LOS submission outcomes?
You can notify a shared staff inbox when a loan application is submitted, or send different emails depending on whether it reaches your loan origination system (LOS). These notifications are for the loan application itself; the FAQ above covers individual applicant tasks.
Option 1: Notify staff about all loan application submissions
Use the event Loan Application Submitted when your team wants a general submission alert, regardless of the LOS outcome. This event can also be sent for an application that later needs attention because its LOS submission failed. It does not confirm that the application reached the LOS.
Create one automation with this event. A suitable subject is “New loan application submitted.”
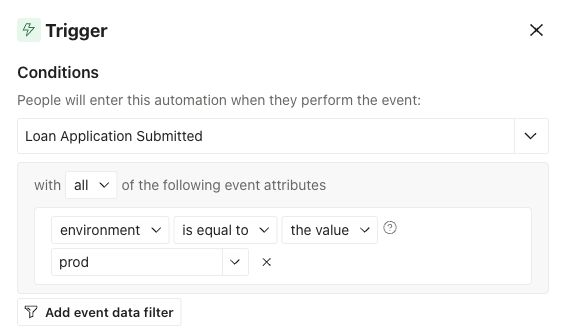
General submission trigger, with a production-only event filter.
Option 2: Send different notifications for LOS success and failure
Choose this option when staff need to know which applications reached the LOS and which need follow-up. Create two separate event-triggered automations:
Loan Submitted to LOS: the application reached the LOS and a status was returned. Suggested subject: “Loan application received by LOS.” This confirms submission, not loan approval.Loan Submission Failed: Glide could not complete the LOS submission and the application moved to Pending Error. Suggested subject: “Action needed: loan submission failed.” Staff should open the application and review the issue. This is a submission problem, not a credit decline.
Use these event names directly. You do not need a separate trigger or branch based on the Loan object’s status.
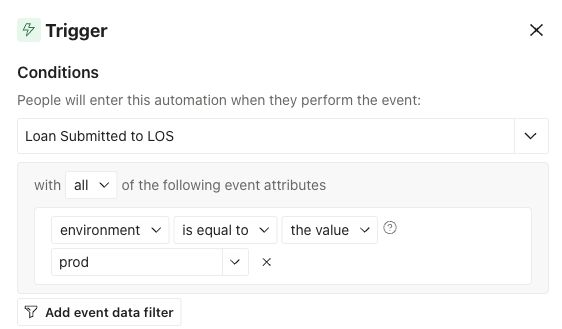
LOS-success trigger for applications received by the LOS.
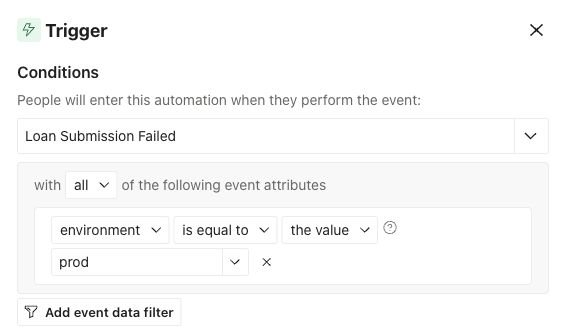
LOS-failure trigger for applications that need staff attention.
Configure each automation
In your institution’s Customer.io workspace, go to Automations → Create automation and choose an Event trigger. Enter the event name from your chosen option exactly as shown.
Set Frequency to On every event, so the same applicant can trigger another notification for another loan application. Leave loan-type filters off if you want to cover all loan products.
Add an event data filter: environment → is equal to → prod. The screenshots show this production-only setup. For a separate test automation, use
stagingand an internal test inbox.Add an Email step, open Edit content, and expand the email header. Set To to the shared staff inbox or distribution list, replacing the default applicant recipient. Choose your institution’s sender and a subject that matches the event.
Personalize the email with the matching fields below. Use
{{customer.first_name}}and{{customer.last_name}}for the applicant’s name.
Detail | Loan Application Submitted | Both LOS outcome events |
|---|---|---|
Loan type |
|
|
Requested amount |
|
|
Loan ID | Not included in this event |
|
Application link | Use your institution’s loan dashboard URL |
|
For the LOS emails, set a “View application” button’s URL to {{event.loan_resume_link}}; this is a complete staff dashboard link. For the general alert, use your institution’s dashboard address followed by /dashboard/loans/applications. If you copy an existing email, update the amount field and link to match its new trigger. These events do not contain applicant-task fields such as task_name.
Test, then avoid duplicate notifications
Keep production emails queued as drafts while you prepare them. Preview each email using sample data for its own event, and send a test to an internal inbox.
Test a loan submission in staging with the test automation running. For the separate LOS alerts, verify a successful submission and a controlled failure; Glide Support can help arrange the failure test. Check Journeys and Message activity, the recipient, the amount, and the application link. Also test another application from the same applicant.
Once testing is complete, set the production emails to send automatically and start the production automation(s).
If the two LOS alerts replace an existing general staff alert, stop that old staff automation after verifying the replacements. Keeping
Loan Application Submittedactive alongside an outcome alert can produce two staff emails for one submission. Keep both only if your team wants both updates. Leave separate applicant-facing confirmation emails in place.
If no notification arrives: Check that the event appears on the applicant’s Customer.io profile, the applicant has an email address, the environment filter matches, and the automation and email are active. A missing success email alone does not prove a submission failed; check the application in Glide and contact Glide Support if the event is missing.